# Get started

### Messaging channels

<table data-view="cards"><thead><tr><th></th><th></th><th></th><th data-hidden data-card-target data-type="content-ref"></th></tr></thead><tbody><tr><td></td><td>SMS</td><td></td><td><a href="/pages/O2R0mcNHtzh0SkYR3o8r">/pages/O2R0mcNHtzh0SkYR3o8r</a></td></tr><tr><td></td><td>WhatsApp</td><td></td><td><a href="/pages/Q8T0K8vschUM5aIPoQEs">/pages/Q8T0K8vschUM5aIPoQEs</a></td></tr><tr><td></td><td>Viber</td><td></td><td></td></tr></tbody></table>

### Features

<table data-view="cards"><thead><tr><th></th><th></th><th></th><th data-hidden data-card-target data-type="content-ref"></th></tr></thead><tbody><tr><td></td><td>SMS Campaign</td><td></td><td><a href="/pages/RfVywsGHY8gJbxYUYvwa">/pages/RfVywsGHY8gJbxYUYvwa</a></td></tr><tr><td></td><td>WhatsApp Campaign</td><td></td><td><a href="/pages/jvA7NyiTCgOb1CX4Rfj5">/pages/jvA7NyiTCgOb1CX4Rfj5</a></td></tr><tr><td></td><td>Conversational Bots</td><td></td><td><a href="/pages/K88VsYEqOOoqxNIeETvH">/pages/K88VsYEqOOoqxNIeETvH</a></td></tr><tr><td></td><td>Contact Book</td><td></td><td><a href="/pages/kJPA8pfin1ogHb8KP6BF">/pages/kJPA8pfin1ogHb8KP6BF</a></td></tr><tr><td></td><td>Integrations</td><td></td><td><a href="/pages/M5Dt0VmBglXAuKN5lY2G">/pages/M5Dt0VmBglXAuKN5lY2G</a></td></tr><tr><td></td><td>Number Lookup</td><td></td><td><a href="/pages/2AEN9VHyqFzL1jmfamE9">/pages/2AEN9VHyqFzL1jmfamE9</a></td></tr><tr><td></td><td>OTP Verification</td><td></td><td><a href="/pages/h5xWNl5d2cl6kzzVm43t">/pages/h5xWNl5d2cl6kzzVm43t</a></td></tr></tbody></table>


# Start using SMS

A comprehensive guide to help you navigate through the SignUp process and register a Sender ID, ensuring your SMS messages are delivered with trust and recognition.

**1. Sign Up for SMS Messaging:**

* If you're new to our platform, click on this [link](https://app.d7networks.com/signin) to begin the sign-up process.
* Fill out the registration form with your details, including your name, email address, and a secure password.
* Verify your email address to activate your account and gain access to our platform's features.

**2. Free Test Credits:**

* As a new user, you are entitled to free test credits, allowing you to send up to 10 outgoing messages.
* The first thing you need to do is claim your test credit through our user portal
* Use these test credits to familiarise yourself with our platform and test the effectiveness of SMS messaging for your business.

**3. Understanding SenderID:**

* SenderID is the alphanumeric or numeric identifier displayed as the sender's name when your customers receive your SMS messages.
* It's crucial for branding and building trust with your audience. Customers are more likely to engage with messages from recognizable SenderIDs.

**4. Registering SenderID:**

* Contact our customer support team to initiate the registration process for your custom SenderID.
* They will guide you through the process and assist with any queries or concerns you may have.

**5. Initial SenderID Provision:**

* For first-time users, we provide a sample SenderID that can be used for a limited time.
* Please note that this sample SenderID will be disabled after the specified period.

**6. Registration Process Duration:**

* The registration process for a custom SenderID typically takes an average of 4 to 10 days to complete.
* However, please be aware that the duration may vary depending on the country's regulations and carrier policies.

By following these steps, you'll be well-equipped to start leveraging SMS messaging for your business communication needs, with a recognizable SenderID that enhances brand identity and customer trust.


# Send SMS Campaign

Boost your sales and customer engagement with Direct7 Networks SMS campaigns. Sign up now for immediate access.

An SMS campaign is a highly effective marketing strategy that leverages the power of text messaging to engage directly with customers. By sending targeted, concise messages to a recipient's mobile phone, businesses can communicate promotions, reminders, and important updates in a way that is immediate and personal.

Direct7 Networks’s SMS campaign is a powerful tool designed to elevate your marketing efforts and enhance customer engagement. With our SMS campaign service, you can effortlessly reach your audience with timely, personalised messages that drive action and deliver results.

To get started with our SMS campaign feature, simply sign up with Direct7Networks and gain immediate access to our user-friendly dashboard. Here's how you can easily schedule, manage, and analyse your SMS campaigns:

Have a quick look at the video below to see how easy it is to schedule an SMS campaign with Direct7 Networks:

{% embed url="<https://d7networks.com/media/documents/campaign.webm>" %}

**Campaign Page Overview**

Our campaign page is designed for maximum user convenience, organized into three intuitive tabs to simplify the process of setting up and managing your SMS campaigns.

**1. Message Tab:**

<figure><img src="/files/CGYqowBiLPYit4ssncBf" alt=""><figcaption></figcaption></figure>

In this tab, you can craft the content of your SMS campaign. We offer several features to help you create effective messages:

* **Unicode Detector**: Automatically identifies and alerts you if your message contains any Unicode characters, ensuring compatibility and optimal delivery.
* **Character Count**: Provides a real-time count of your message characters and the number of message parts, helping you stay within SMS length limits.
* **Predefined Templates**: Choose from a variety of professionally designed templates to quickly create compelling messages.
* **Personalization Options**: Easily personalise your text messages with placeholders for recipient names, dates, and other custom details to enhance engagement.

{% embed url="<https://d7networks.com/media/documents/message.webm>" %}

**2. Contacts & Schedule tab**

One of the key aspects of campaign scheduling is adding your target audience, specifically the recipient phone numbers. Given that your list might include thousands of contacts, manually adding each number would be incredibly time-consuming. To streamline this process, we offer four efficient options for adding recipients to your SMS campaign:

<figure><img src="/files/FxKpEJPmGSRtvaeIGPS4" alt=""><figcaption></figcaption></figure>

* **Copy Paste:** Enter phone numbers individually for smaller or highly specific lists.
* **Add from Contacts:** Quickly import phone numbers directly from your existing contact list within the platform.
* **Add from Group:** Select predefined groups of contacts that you’ve already organised, making it easy to target specific segments of your audience.
* **Import from CSV:** Upload a CSV file containing all your recipient phone numbers for bulk additions. This is ideal for large-scale campaigns, ensuring a quick and hassle-free import process

**Note:** For detailed instructions on adding Contacts and Groups, please refer to the [Contact book](/contact-book/add-your-contacts) section in the documentation.

We provide the flexibility to allow or disallow **duplicate contacts**. When disallowed, only unique contacts will be included as campaign recipients. However, if permitted, the same contact number may appear multiple times. This duplication feature proves beneficial in scenarios where you filter your contacts based on variables or if you have personalised messages to send, where the same contact number may have different associated variables in your contact book.

Additionally, there is an option to [**filter recipients**](/sms/send-sms-campaign/campaign-filters) based on rules you provide, allowing for more precise targeting.

Once the recipients are added, you can easily schedule the timing of your campaign to ensure it reaches your audience at the optimal moment.

**3. Summary Tab**

In this tab, a country-wise recipient list will be displayed, giving you a clear overview of your campaign's reach and ensuring that your messages are being sent to the correct regions.

<figure><img src="/files/TPeu8H3VO385D4MKfwX2" alt=""><figcaption></figcaption></figure>

<br>


# Campaign Filters

* First Sync the latest entries from Zoho Contact / Lead to the Contact Group&#x20;
* Navigate to Contact Groups and click on Sync Contact Option. (This will be automated soon)&#x20;
* Next, it will be directed to the Import/Export window.

{% embed url="<https://d7networks.com/media/gif/syncontact.gif>" %}

* To map the variables,Go to Contacts > List. Select "Add/Remove Contacts."&#x20;
* Choose "Import from Integrations." Add a group name, select integration and contact type, then click "Add contacts to a group."&#x20;
* Map variables and click "Map and Save."

{% embed url="<https://d7networks.com/media/gif/mapvariables.gif>" %}

* Once the process is completed, Navigate to SMS > Campaign > Campaign Sender&#x20;
* Click on Next
* Then, Click on Recipient > Select Add from Group&#x20;
* Choose the Zoho lead/contact group&#x20;
* Now the Filtering option will be available&#x20;
* Add a filter and proceed with the campaign

{% embed url="<https://d7networks.com/media/gif/filtering.gif>" %}


# SMS Report

Get a complete view of your SMS records. search, filter, and download detailed logs and reports for better campaign analysis.

This document outlines the features and functionalities available on the SMS Report page.

<figure><img src="/files/mT1YprrvSndrnu9uJxDQ" alt=""><figcaption></figcaption></figure>

### Features

#### Search Functionality

* **Keyword Search**: Users can search for specific records by entering keywords in the search bar. This helps in quickly locating relevant SMS records.
* **Timeframe**: By default, the page displays records from the last one month from the current date.

#### Filters

* **Country Filter**: Users can filter SMS records based on the country. This is useful for analyzing SMS performance or issues in specific regions.
* **Message Status Filter**: The message status filter allows users to narrow down records based on the status of the SMS. The available statuses include:
  * Sent
  * Delivered
  * Scheduled
  * Undelivered

#### Detailed Log View

* **View Detailed Log**: Each SMS record has an option to view its detailed log. This log provides additional information about the message, such as:
  * Request ID
  * SMS rate
  * Total cost
  * Number lookup status
  * Data coding

#### Report Download

* **Download Report**: Users can download the SMS report in CSV format for further analysis or record-keeping. This feature is accessible via the Export button.

To fully understand the functionalities and user interface of the SMS Report page, it is recommended to watch the associated video demonstration.

{% embed url="<https://d7networks.com/media/documents/sms_report.webm>" %}


# SMS settings

Learn how to configure your SMS settings for optimal sending and receiving. Discover the available options and how to configure them.

### Settings

<figure><img src="/files/MKvnC2WJ1vFsSE6Exwmw" alt=""><figcaption></figcaption></figure>

#### Default Sender ID

* **Enable Default SenderID**: This option allows users to specify a default SenderID for outgoing messages.
  * **If enabled**, All messages will be sent from the specified default SenderID.

#### Default Country

* **Enable Default Country**: This option restricts message delivery to a specified country.
  * **If enabled**: Messages will only be sent to the selected default country.

#### Daily Report

* **Enable Daily Report**: Users can opt to receive a daily report of SMS activity via email.
  * **If enabled**: Enter the email address to which the daily SMS report will be sent.

#### Number Lookup

* **Enable Number Lookup**: This option enables number lookup for every SMS sent from your account.
  * **Benefit**: Helps ensure SMS messages are only sent to reachable numbers.
  * **Additional Charges**: Note that additional charges apply for this service.

**Low Credit Threshold**

* **Threshold Setting**: Users can set a threshold for their SMS credits, either as a percentage or a dollar amount.
  * **When the credit reaches the specified threshold**: An email alert will be sent to the registered email address.
  * **Low Credit Alert**: Only an email will be sent when the threshold is reached, but the service will continue until the balance reaches zero.

#### Report URL

* **Report URL**: Users can specify a URL to receive postbacks of message statuses.
  * **Postback URL**: Enter the URL where the message status updates will be sent.

**Inbound Setting**

* **Enable Mobile Originated (MO) Messages:**  This option allows users to handle incoming messages.
  * **If enabled**: Enter the webhook URL where incoming messages will be delivered.
  * **Auto Recharge Requirement**: To enable MO, the auto recharge option must also be enabled.


# FAQs

&#x20;**1. How can I get pricing details for a particular country?**

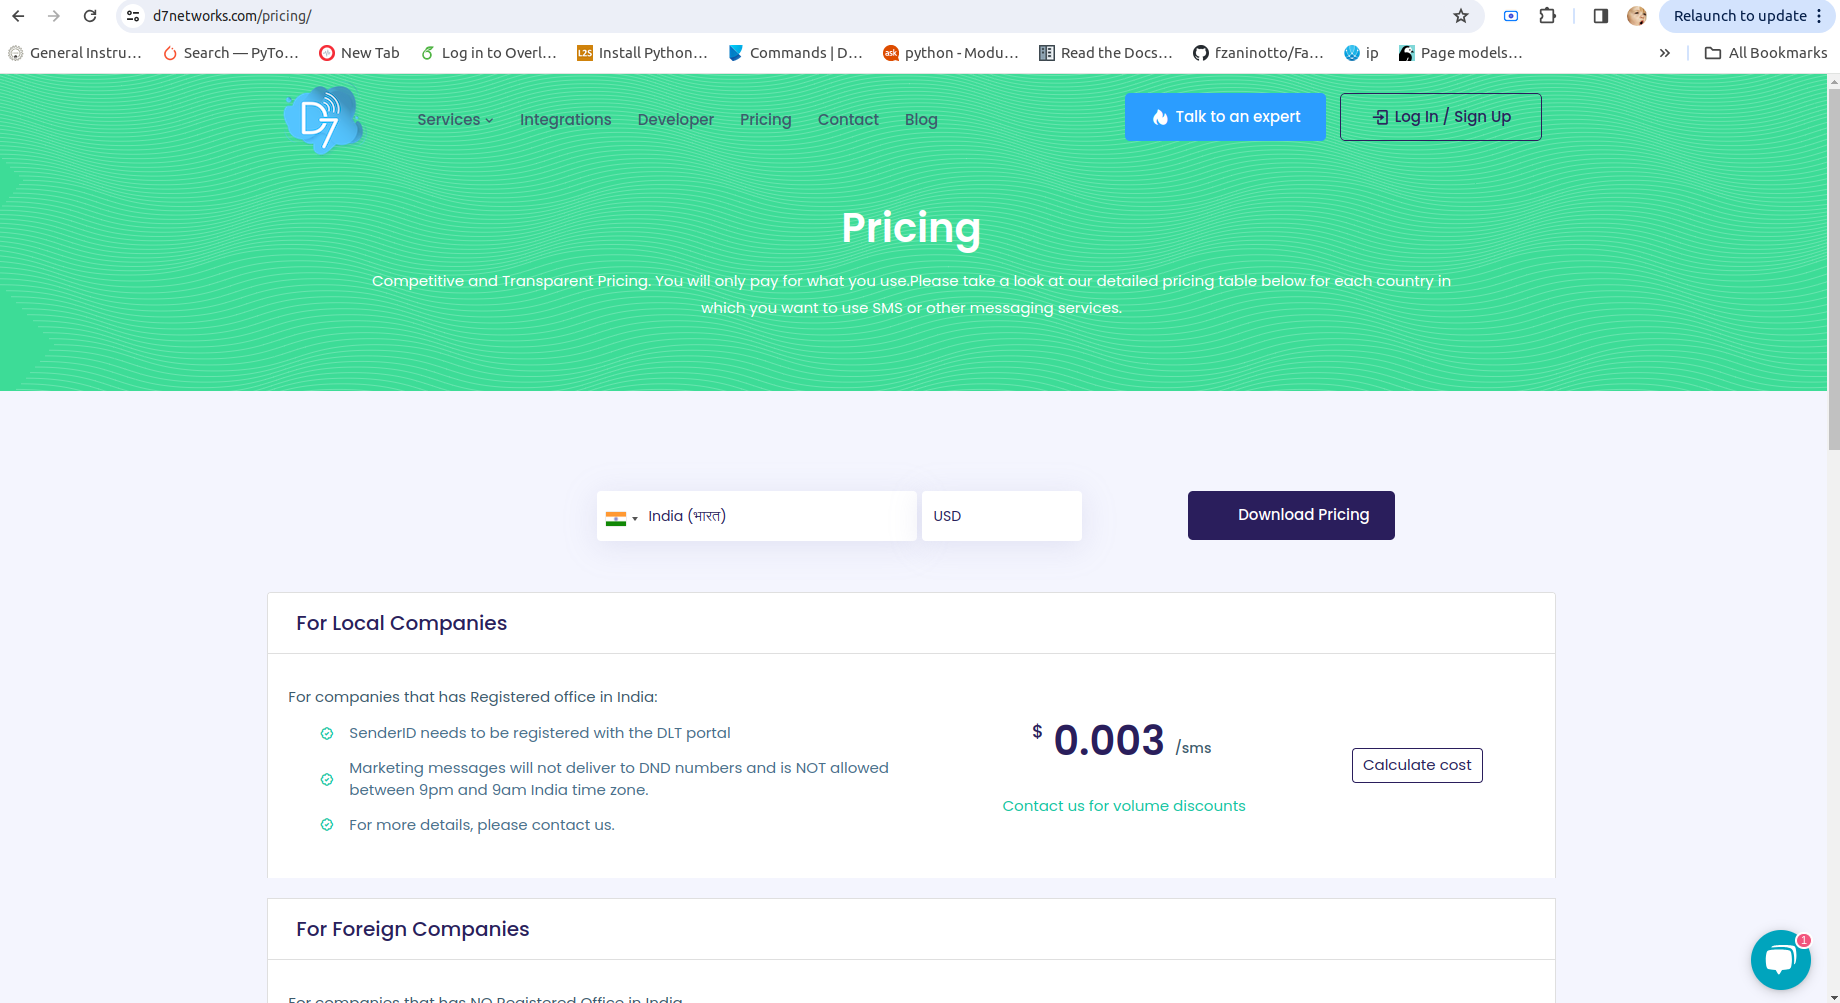
You can find the pricing details for specific countries on our [pricing page](https://d7networks.com/pricing/). This page provides a comprehensive breakdown of costs associated with sending messages to different regions.

**2. How can I get SenderID registration details for a particular country?**

SenderID registration details for specific countries are also available on our [pricing page](https://d7networks.com/pricing/) This section provides information on the requirements and processes for registering a Sender ID in various countries.

<figure><img src="/files/REro9vLSQBMVgEkSp0bY" alt=""><figcaption></figcaption></figure>

**3. What is the character limit for a SenderID?**

The Sender ID can have between 3 to 11 characters, including spaces and special characters.

**4. What is the character limit for a message?**

* For text messages, the character limit is 160 characters per message.
* For Unicode messages, the character limit is 70 characters per message.

**5. How can I update my email ID or mobile number?**

You can update your email ID or mobile number in the profile section of the dashboard. Navigate to your profile settings and make the necessary changes.

{% embed url="<https://d7networks.com/media/documents/update_profile.mp4>" %}


# Start using WhatsApp

Onboard WhatsApp effortlessly. Follow our easy steps for a smooth Meta registration experience.

Utilizing WhatsApp for business communication is a powerful strategy, but it often involves technical complexities, especially when it comes to registering your business with Meta. Direct 7 Networks offers simplified solutions, making the on-boarding process seamless and accessible.&#x20;

Below, we'll outline the steps required for registering your business with Meta

### **Onboarding Steps:**

**Pre-requisites:**

* **Valid Mobile Number:** Ensure access to a mobile number **not** active on WhatsApp.
* **Facebook Page:** Own or have administrative access to a Facebook page.

1. **Create/ Login to your Account on d7networks.**
   * If new user, Visit <https://app.d7networks.com/signin> and sign up using your email address. Otherwise login to your D7 account
2. **Initiate WhatsApp Setup:**

   * Navigate to the WhatsApp tab and click "Getting Started."

<figure><img src="/files/uLHgSxLbIecdbPLMPP4p" alt=""><figcaption></figcaption></figure>

1. **Provide Details in Meta Page and complete OTP verification :**

   * On clicking add Whatsapp number, a new window will be opened and it will guide you through the authorization and phone number verification process

<figure><img src="/files/dIwy0PqLJobOS4KmLlnP" alt=""><figcaption></figcaption></figure>

<figure><img src="/files/2ndtx7NKYMNzIZpCxnn8" alt=""><figcaption></figcaption></figure>

<figure><img src="/files/ueQ312iAk4mhD3VUTHLh" alt=""><figcaption></figcaption></figure>

<figure><img src="/files/qgFy2FTYxuNWnuesj2Ff" alt=""><figcaption></figcaption></figure>

<figure><img src="/files/Fpq8zgIUvwjF0y7BDyYf" alt=""><figcaption></figcaption></figure>

<figure><img src="/files/jGWpHdgqgDtfndTDyAv5" alt=""><figcaption></figcaption></figure>

2. **Complete Account Verification with Meta:**

* This has to be done from meta business suite

3. **Add Payment Methods and Recharge Account:**

* Add preferred payment methods in account settings.
* Recharge account balance to cover fees.

**Note:** We highly recommend you to get assistance from our support team to get these two steps done.

4. **Create Templates and Start Campaign:**

* Develop message templates adhering to WhatsApp policies.
* Launch campaigns to engage with your audience effectively.

By following these steps, you'll be able to seamlessly integrate WhatsApp Business API into your communication strategy, enhancing customer interactions and driving business growth.

<br>

<br>


# Send WhatsApp Campaign

Boost your customer engagement with WhatsApp message campaigns. Share rich content and drive action with our platform.

Engage with your audience like never before with our latest WhatsApp Message Campaign feature. As one of the most popular messaging platforms worldwide, WhatsApp offers an unparalleled opportunity to connect with customers in a direct and meaningful way. With our platform, you can harness the power of WhatsApp to deliver targeted messages, share rich multimedia content, and drive engagement like never before.

\
Navigating the world of WhatsApp messaging can be daunting, but we’ve made it easy for you. With our platform, creating and managing WhatsApp campaigns is as straightforward as designing a template and selecting it for your campaign.

Check out the video below to see how simple it is to schedule a WhatsApp campaign with Direct7 Networks

{% embed url="<https://d7networks.com/media/images/1.webm>" %}

Streamline Your WhatsApp Campaign Setup with Our User-Friendly Interface

Our WhatsApp campaign page is designed for ease of use, divided into three straightforward tabs:  **Message**, **Contacts & Schedule**, and **Summary**. This structure ensures a seamless experience from start to finish.

**1. Message**

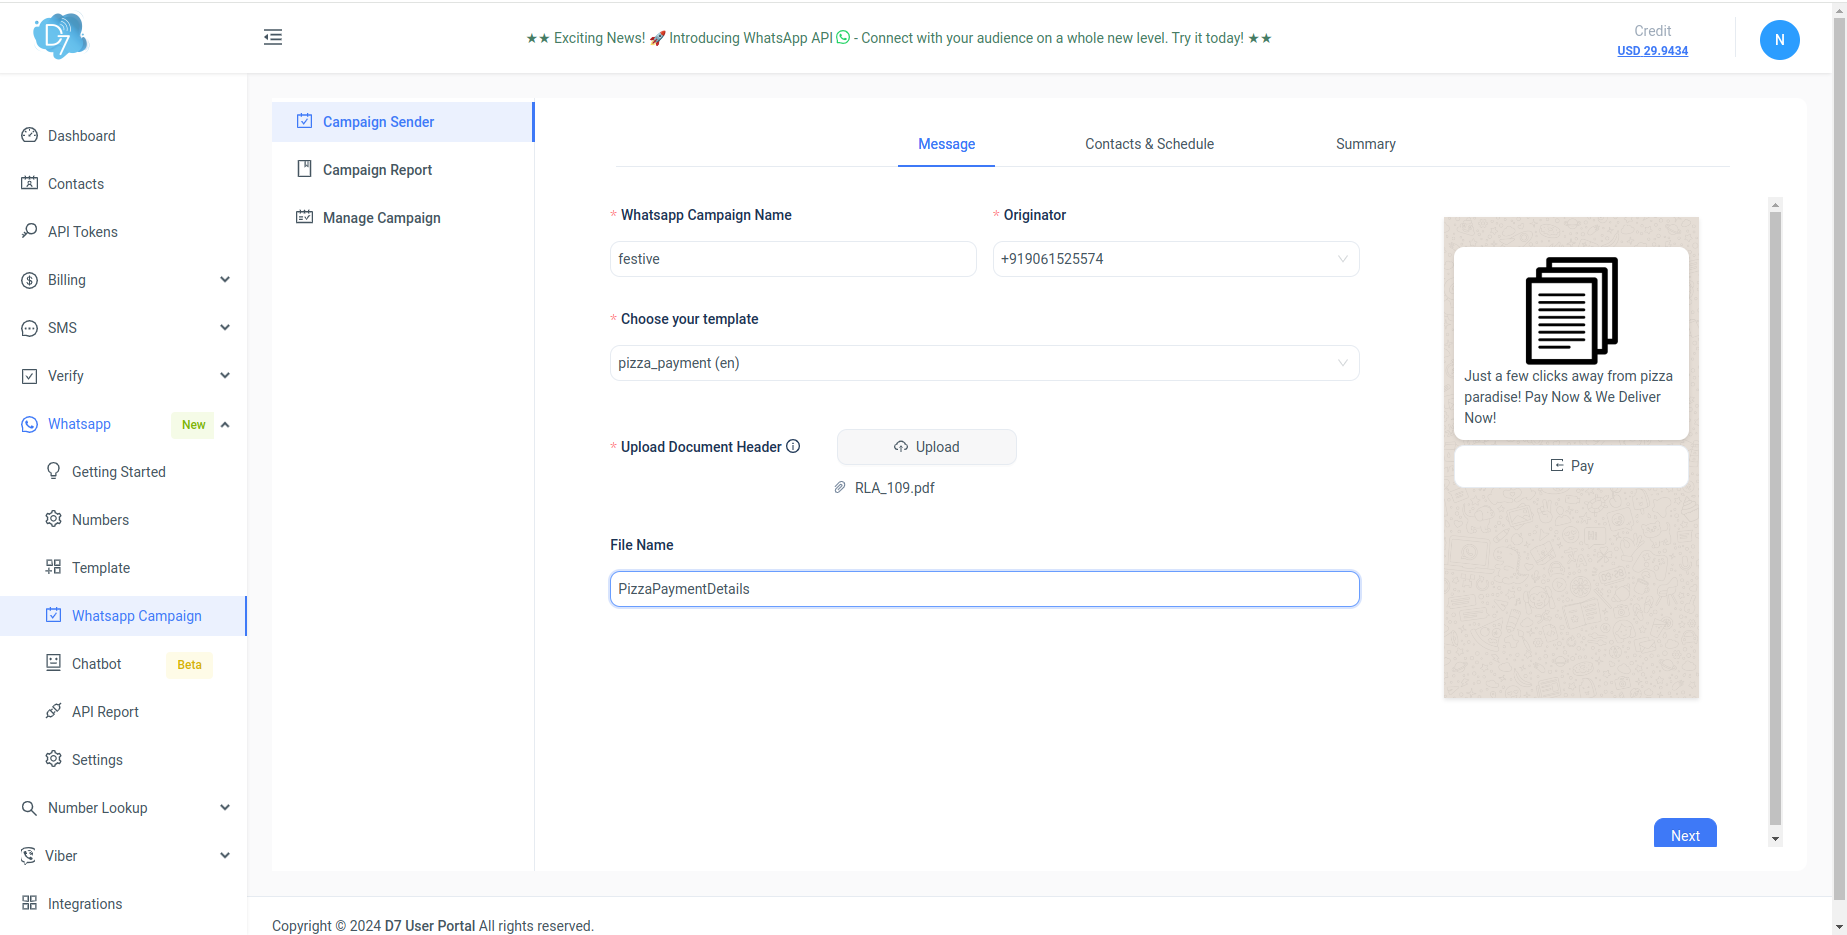
<figure><img src="https://d7networks.com/media/images/4.png" alt=""><figcaption></figcaption></figure>

* **Whatsapp Campaign Naming**: Begin by naming your whatsapp campaign. This helps in easily identifying and managing multiple campaigns.
* **Select the Originator**: Choose the sender ID that your recipients will see. This can be your business name or a recognizable identifier, enhancing trust and clarity for your audience.
* **Predefined Message Templates**: Select from a list of pre-approved message templates. Meta requires that all business-initiated WhatsApp messages be pre-approved, so custom messages cannot be created on-the-go.                                                                                                                                   **Note:** We have made it easy for you to create templates of your chose fro  within our user  dashboard. Learn more about creating and managing whatsapp templates[ here](/whatsapp/managing-whatsapp-templates)
* **Template Selection**: Browse through the available templates and choose the one that best fits your campaign's objectives.
* **Provide Required Fields**: Each template has specific fields that need to be filled out. Enter the necessary information to complete the message.
* **Preview and Personalize**: Use the preview option to see how your message will appear to recipients. Personalise the variables within the template to tailor the message for individual recipients, ensuring a more personal touch.

**2. Contacts & Schedule**

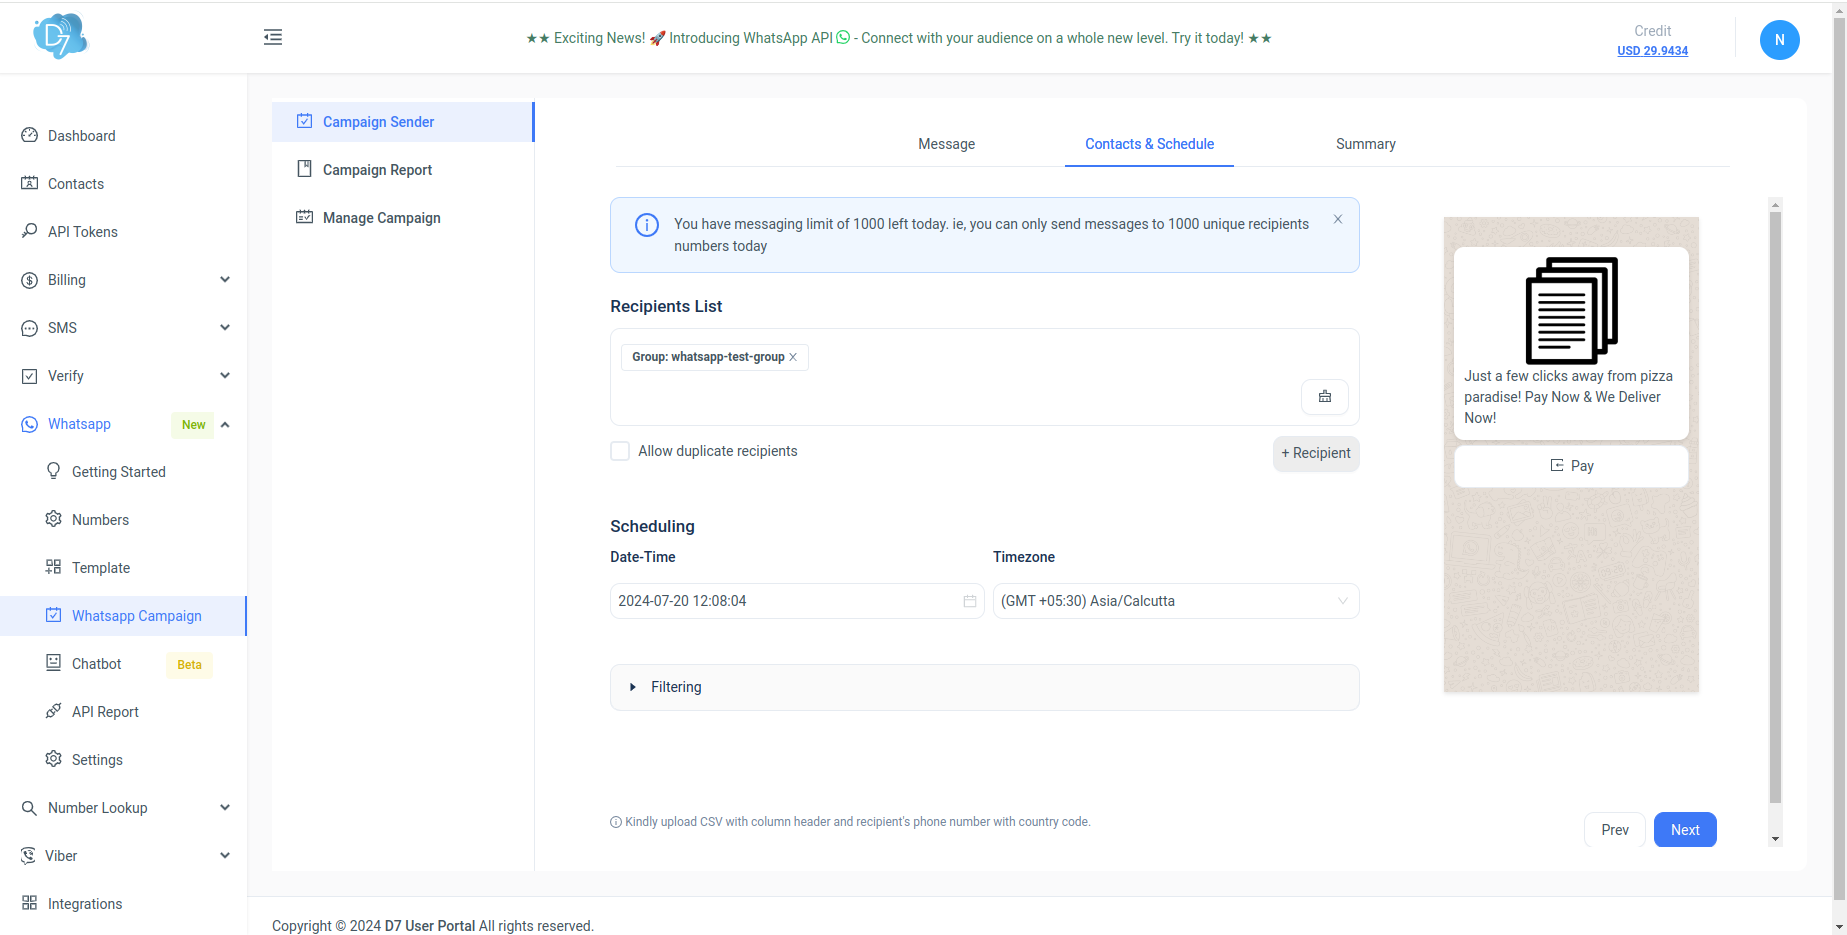
One of the key aspects of campaign scheduling is adding your target audience, specifically the recipient phone numbers. Given that your list might include thousands of contacts, manually adding each number would be incredibly time-consuming. To streamline this process, we offer four efficient options for adding recipients to your Whatsapp campaign:

<figure><img src="https://d7networks.com/media/images/3.png" alt=""><figcaption></figcaption></figure>

* **Copy Paste:** Enter phone numbers individually for smaller or highly specific lists.
* **Add from Contacts:** Quickly import phone numbers directly from your existing contact list within the platform.
* **Add from Group:** Select predefined groups of contacts that you’ve already organised, making it easy to target specific segments of your audience.
* **Import from CSV:** Upload a CSV file containing all your recipient phone numbers for bulk additions. This is ideal for large-scale campaigns, ensuring a quick and hassle-free import process

**Note:** For detailed instructions on adding Contacts and Groups, please refer to the [Contact book](/contact-book/add-your-contacts) section in the documentation.

We provide the flexibility to allow or disallow **duplicate contacts**. When disallowed, only unique contacts will be included as campaign recipients. However, if permitted, the same contact number may appear multiple times. This duplication feature proves beneficial in scenarios where you filter your contacts based on variables or if you have personalised messages to send, where the same contact number may have different associated variables in your contact book.

Additionally, there is an option to [**filter recipients**](/sms/send-sms-campaign/campaign-filters) based on rules you provide, allowing for more precise targeting.

Once the recipients are added, you can easily schedule the timing of your campaign to ensure it reaches your audience at the optimal moment.

**4. Summary**

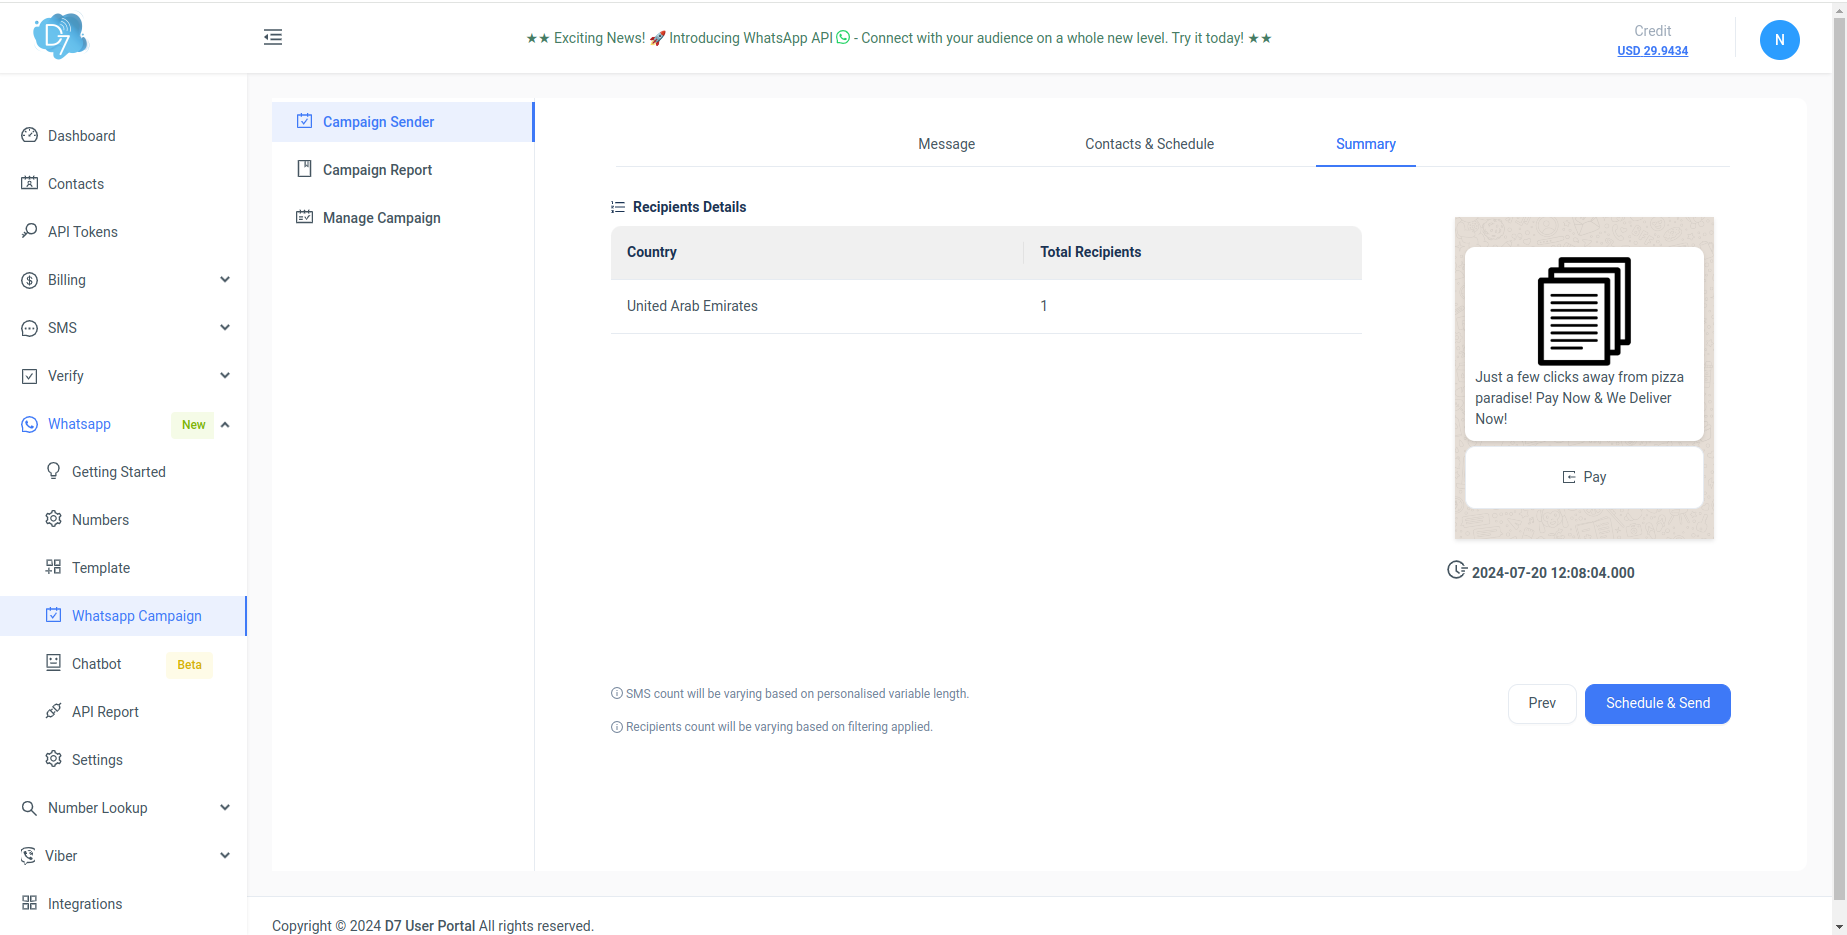
<figure><img src="https://d7networks.com/media/images/2.png" alt=""><figcaption></figcaption></figure>

* **Review Campaign Details**: In this tab, a country-wise recipient list will be displayed, giving you a clear overview of your campaign's reach and ensuring that your messages are being sent to the correct regions.
* **Final Adjustments**: Make any necessary changes before launching. You can easily go back to the relevant tab to edit details.
* **Launch Campaign**: Once everything is set and reviewed, click Schedule & Send with confidence.

By organizing the setup process into these Three tabs, we ensure that creating a WhatsApp campaign is straightforward and efficient. Our platform takes care of compliance with Meta’s guidelines, allowing you to focus on crafting impactful messages that effectively reach your audience.

\ <br>


# Whatsapp Campaign Filter

* First Sync the latest entries from Zoho Contact / Lead to the Contact Group&#x20;
* Navigate to Contact Groups and click on Sync Contact Option. (This will be automated soon)&#x20;
* Next, it will be directed to the Import/Export window.

<figure><img src="https://d7networks.com/media/gif/syncontact.gif" alt=""><figcaption></figcaption></figure>

* To map the variables,Go to Contacts > List. Select "Add/Remove Contacts."&#x20;
* Choose "Import from Integrations." Add a group name, select integration and contact type, then click "Add contacts to a group."&#x20;
* Map variables and click "Map and Save."

<figure><img src="https://d7networks.com/media/gif/mapvariables.gif" alt=""><figcaption></figcaption></figure>

* Once the process is completed, Navigate to Whatsapp > Whatsapp Campaign > Campaign Sender&#x20;
* Click on Next
* Then, Click on Recipient > Select Add from Group&#x20;
* Choose the Zoho lead/contact group&#x20;
* Now the Filtering option will be available&#x20;
* Add a filter and proceed with the campaign

{% embed url="<https://d7networks.com/media/images/5.webm>" %}


# Types of WhatsApp Templates

Discover the different types of templates for WhatsApp business campaigns. Boost engagement with targeted, effective messaging.

### 1.**Custom Templates**

Custom templates allow you to tailor the message format to suit your specific needs. This type of template is versatile and can be used for a variety of messaging purposes, from promotional content to informational updates.

**Example:**

<figure><img src="/files/hfy8ONOk9RXf4lcxSY2p" alt="" width="188"><figcaption></figcaption></figure>

**Features**:

* Fully customizable message content.
* Support for text, media, and interactive elements.
* Suitable for marketing, notifications, and more.

### **2. Carousel Templates**

Carousel templates are designed to display multiple items in a sliding format. This template is ideal for showcasing products, services, or multiple offers in a single message.

**Example:**

<figure><img src="/files/gx6zpNwBNaXXYP4HVSBg" alt="" width="563"><figcaption></figcaption></figure>

**Features**:

* Interactive carousel format.
* Each card can contain images, text, and buttons.
* Engages users with visually appealing content.

### **3. Limited Time Offer (LTO) Templates**

LTO templates are crafted for time-sensitive promotional messages. These templates are perfect for flash sales, limited-time discounts, and other urgent offers.

<figure><img src="/files/6PPYEJohP2Lzvd2QxY5r" alt="" width="363"><figcaption></figcaption></figure>

**Features**:

* Emphasises urgency with a focus on time-limited deals.
* Can include countdown timers or expiry information.
* Designed to drive immediate action from recipients.

### **4. Authentication Templates**

If your mobile app allows users to receive one-time passwords (OTPs) or verification codes via WhatsApp, you need to use an authentication template. Here's what you need to know:

Authentication templates include:

* **Fixed Text**: "Your verification code is \<VERIFICATION\_CODE>."
* **Optional Security Disclaimer**: "For your security, do not share this code."
* **Optional Expiration Warning**: "This code expires in \<NUM\_MINUTES> minutes."
* **Buttons**: One-tap autofill, copy code, or no button for zero-tap.

**Types of Authentication Templates**

1. **One-Tap Autofill Authentication Templates**:

<figure><img src="/files/Wg2HNWuFfCQUMmBtPjfO" alt="" width="375"><figcaption></figcaption></figure>

* **Description**: Users tap a button in WhatsApp that automatically fills the code in your app.
* **Best For**: Android users.

2. **Copy Code Authentication Templates**:

<figure><img src="/files/P8Q19GzoPY25SRKu5uGV" alt="" width="375"><figcaption></figcaption></figure>

* **Description**: Users tap a button to copy the code to the clipboard, then paste it into your app.
* **Best For**: All devices.

3. **Zero-Tap Authentication Templates**:

<figure><img src="/files/cg8XhR3Z3MKxJPa6aeh0" alt="" width="375"><figcaption></figcaption></figure>

* **Description**: The code is broadcasted to your app without the user leaving the app.
* **Best For**: Seamless user experience without switching apps.

**Best Practices**

* **Confirm User's Number**: Make sure the user's WhatsApp number is correct before sending codes.
* **Clear Communication**: Inform users that the code will be sent to their WhatsApp number.
* **Visibility**: Notify users when your app captures the code.

**Time-To-Live (TTL)**

* **Default TTL**: 10 minutes for new templates, but can be set between 60 and 600 seconds.
* **TTL Importance**: Ensure TTL matches your code's expiration time to avoid sending unusable codes.

### **5. Flow Templates**

Flow templates are designed to create interactive, step-by-step user journeys directly within WhatsApp. Instead of sending static messages, businesses can guide users through structured flows like forms, selections, or multi-step actions without leaving the chat.

These templates are ideal for creating seamless, app-like journeys directly inside WhatsApp.

<div align="center" data-with-frame="true"><figure><img src="/files/ug0EguJhbzT02TOh7uxP" alt="" width="188"><figcaption></figcaption></figure></div>

**Features**:

* Guides users through structured flows with multiple screens or steps
* Supports fields like text input, dropdowns, radio buttons, checkboxes, and date pickers.
* Keeps users within WhatsApp, reducing friction and drop-offs.
* Enables real-time actions such as booking appointments, collecting leads.


# Managing Whatsapp Templates

Streamline your WhatsApp template creation and registration process with us.

Our platform includes a feature that allows you to create and register WhatsApp templates with Meta. This process is designed to be straightforward, following a three-step procedure across three tabs. Below are the details.

**Step 1: Select WABA ID and Basic Information**

<figure><img src="/files/pBZ6Ddd5hZShhE6y0pqX" alt=""><figcaption></figcaption></figure>

**Details**:

1. **WABA ID**:
   * Select your WhatsApp Business Account (WABA) ID from the available list. This ID is necessary for identifying your business account when registering templates with Meta.
2. **Language**:
   * Choose the language for your template. This ensures that your messages are appropriately localized for your target audience.
3. **Template Category**:
   * Select the category for your template from the following options:
     * **Marketing**: Used for promotional content aimed at engaging customers and driving sales.
     * **Utility**: Used for informational content such as updates, notifications, and reminders.
     * **Authentication**: Used for verification and authentication purposes, such as OTP messages.
4. **Template Type** (Based on Category):
   * Depending on the selected category, choose the template type:
     * **Authentication**: No subtype selection is required.
     * **Marketing**:
       * **Carousel**: Suitable for displaying multiple items in a sliding format.
       * **Custom**: Allows for a tailored message format.
       * **Limited Time Offer**: Designed for time-sensitive promotional messages.
     * **Utility**:
       * **Custom**: Allows for a tailored message format.
       * **Carousel**: Suitable for displaying multiple items in a sliding format.

**Step 2: Designing the Template**

The options in this tab will differ according to the category and type of template selected. Below is an example for designing options for a Marketing Limited Time Offer (LTO) template. We have structured this section in such a way that, by following the on-screen instructions, you can effortlessly create the template type you selected. To get an idea about the various template types and how they will appear to the customer, check out [this](/whatsapp/types-of-whatsapp-templates).

<figure><img src="/files/U3vhFNj3LV2e20fn7Sx1" alt=""><figcaption></figcaption></figure>

**Step 3: Adding Interactive Elements**

This tab is an extension of the Template Design tab, where you can add buttons and other interactive components to your template.Below is an example for a Marketing Limited Time Offer (LTO) template.

<figure><img src="/files/b9iUdUN3ZKvNwlFHtXlo" alt=""><figcaption></figcaption></figure>

**Adding Buttons and Defining Actions**:

1. **Buttons**:

   * Add interactive buttons to your template to enhance user engagement. For example:

     * **Call to Action**:  Customers may be hesitant to click on long or unclear URLs in text messages. Instead, you can use interactive call-to-action (CTA) URL button messages. These allow you to link any URL to a button, avoiding the need to include the raw URL in the message itself.

     <figure><img src="/files/msNV4jkdphpQ2XUvgEAZ" alt="" width="375"><figcaption></figcaption></figure>

     * **Quick Replies**: Reply button messages let you offer choices for users to pick from. When a user selects one of these buttons, it sends a message back to you with their choice.

   &#x20;      <img src="/files/3cDkVu3JuUw9DUeulhap" alt="" data-size="original"> <img src="/files/7riyeh97YCXaKUxP0qmW" alt="" data-size="original">

2. **Configuring Action on Button Click**:
   * Define the actions associated with each button, such as redirecting to a webpage, dialing a phone number,or both ,opening flow, adding copy code or sending a predefined response.

3. **Preview:**
   * Preview the template with the interactive elements to ensure it appears as intended.


# Managing Whatsapp Flows

Streamline your WhatsApp Flow creation with us.

**WhatsApp Flow** refers to a structured, automated interaction between a user and a business on WhatsApp, typically used in customer service, sales, or support. It guides users through a sequence of messages or choices—like a chatbot—allowing them to complete tasks such as booking appointments, placing orders, etc. These flows enhance user experience by making conversations fast, interactive, and efficient.

**Step 1: Select WABA ID and Basic Information**

<figure><img src="/files/H2YXOGSoI8ZQ4R5z3rEi" alt=""><figcaption></figcaption></figure>

#### Details

1. **WABA ID**:

* Select your WhatsApp Business Account (WABA) ID from the available list. This ID is necessary for identifying your business account when registering flows with Meta.

#### Step 2:Design the Flow Screens and Preview&#x20;

In this screen, users can add new screens to the flow or edit existing ones. Additionally, users have the ability to add or modify components within each screen. To the right of the editor, a live preview area displays how each screen will appear, allowing users to instantly see the impact of their changes.

<figure><img src="/files/MtBXVV5B5dejCgNcFUTM" alt=""><figcaption></figcaption></figure>


# Set up WhatsApp ChatBot

Create and manage WhatsApp chat flows with our chatbot feature.

Our dashboard includes a chatbot feature that lets you design and manage your own WhatsApp chat flows, providing an intuitive way to create automated conversations and enhance customer interactions.

<figure><img src="/files/C8pXNHJnmmdeR8FEyZ1s" alt=""><figcaption></figcaption></figure>

**Getting Started**

1. **Creating Your Chatbot**:
   * Upon accessing the chatbot feature, a form will open asking you to provide a name for your chatbot. Choose a name that represents the function or purpose of your chatbot.
   * Additionally, you will have the option to choose a registered WhatsApp phone number for your chatbot. This step is optional, meaning you can create your chat flows without connecting to a WhatsApp registered number. Note that, as of now, one phone number can be connected to one chat flow.
   * You will have the option to add keywords. This step is optional. If added, the chatbot will start replying when a user sends a first message that matches the keywords.
   * Enable session expiry to set an idle time in minutes. If the user becomes inactive during a conversation, the chatbot will automatically send a session expiry message.
2. **Drawable Page Interface**:
   * After naming your chatbot and optionally selecting a WhatsApp phone number, you will be taken to a drawable page. This is where you can define and visualize your WhatsApp chat flow.
   * The drawable interface allows you to create nodes and connect them, representing the flow of the conversation.

**Creating Your Chat Flow**

1. **Adding Messages**:
   * **Text Messages**: You can add simple text messages that will be sent to users at specific points in the conversation.
   * **Media Messages**:Upload and share images, videos, documents, stickers, audio, contacts, and locations with users.
   * **Interactive Messages**: Enhance user engagement with interactive elements such as buttons, lists, and links for quick responses.
   * **Conditional Logics**:Control how the conversation flows by setting up rules. Based on whether a condition is met, the bot automatically routes the user to the correct next step.
     1. **User input & value** \
        Define conditions based on what the user types or a specific value you set. If the condition is satisfied, the flow moves to the corresponding **Yes** step. If not satisfied, it redirects to the **No** step — ensuring every user always follows the right path.
     2. **Business hours**

        When a user messages within the configured time zone and active time window, the flow continues to the next step. Messages received outside business hours are routed to a separate fallback step.
   * **Integration :**&#x59;ou can trigger automated actions and extend your conversation flow.
     1. &#x20;**Webhook**&#x20;

        Call any external API directly from your flow\.You can test the webhook before saving and capture the response. Based on the response received, the flow can be routed to different next steps — letting you branch logic depending on what the external service returns.
     2. **Nested bot**

        Within your deployed bot, you can connect other bots you've already built and saved on the platform. When the conversation reaches this step, messages are passed through the connected bot — allowing complex, reusable sub-flows to run seamlessly within the main conversation.
   * **Frequency Control:**&#x53;et a trigger frequency to manage how often a flow runs. You can choose to either stop the flow entirely or skip the current step and move forward if the time limit is reached.
2. **Defining the Flow**:
   * Use the drawable interface to connect different messages and create a coherent conversation flow.
   * Each node represents a step in the conversation, and arrows define the path the conversation takes based on user interactions.
3. &#x20;**Test Your Flow**:
   * Once you have defined your chat flow, save your progress and use our built-in simulator to test it. This allows you to preview exactly how the chatbot interacts with user responses in real time, ensuring everything works perfectly before you deploy it.
4. **Saving and Deploying the Flow**:
   * Once you have defined your chat flow, save the flow.
   * To see your chat flow in action, deploy the flow. This will activate your designed conversation and make it functional for user interactions.

**Chatbot Performance Analytics**\
Gain deep insights into how your automation is performing with our comprehensive data dashboard.

Track the following key metrics to optimize your user experience:

* Total Users:The number of users who have interacted with the chatbot since its deployment.
* Unique Users:The number of distinct user who have messaged the bot.
* Active Conversations: The number of conversation currently in progress.
* Completion Rate: The percentage of users who started a flow and successfully completed.
* Drop-off Rate: The percentage of users who exited the flow before finishing.&#x20;

To understand the chatbot feature better and see it in action, please watch our instructional video&#x20;

{% embed url="<https://d7networks.com/email-files/D7images/whatsappdemo_chatbot.mp4>" %}

**Important Note :** To see your created chat flow in action, you must connect it with a Meta-registered business phone number. This step is essential for the chatbot to interact with users via WhatsApp.

**Feedback and Support**

As this feature is in beta, your feedback is invaluable to us. Please share any issues or suggestions you have to help us improve the chatbot functionality. For support, reach out to our customer service team via email at  *<mark style="color:blue;"><support@d7networks.com>.</mark>*


# FAQs

**1.What is WhatsApp Business Verification?**    &#x20;

WhatsApp Business Verification is a process by which WhatsApp verifies the authenticity and legitimacy of a business account. Verified accounts receive a green checkmark badge on its WhatsApp Business profile, signifying to users that they are communicating with a trusted business.    &#x20;

Business verification unlocks additional features and functionalities, such as a verified business profile and the ability to send notifications.                                                                                                       &#x20;

Meta may require various documents to verify a business, depending on factors such as the business's location, industry, and legal structure. Commonly requested documents include business registration certificates, tax IDs, and proof of address.

**2.How Long Does the Verification Process Take?**&#x20;

The verification process duration can vary depending on factors such as the volume of verification requests and the completeness of the submitted documentation. In some cases, verification may be completed within a few days, while in others, it may take longer.

#### 3. What are the requirements for registering a business phone number?

To register a business phone number, it must:

* Be owned by you.
* Have a country and area code (short codes are not supported).
* Be able to receive voice calls or SMS for verification.

Registered numbers can still be used for everyday purposes, such as calling and text messages.

Numbers already in use with the WhatsApp Messenger app or WhatsApp Business app cannot be registered unless they are deleted first.

Banned WhatsApp numbers cannot be registered unless they are unbanned first.

#### 4. What is the limit on registered business phone numbers?

Business portfolios are initially limited to 2 registered numbers, which can increase up to 20 based on usage and quality ratings.

**5.How is Pricing Determined for Messages Sent to Different Countries?**&#x20;

Pricing for messages sent to different countries via the WhatsApp  is typically determined based on factors such as the destination country, message type, and volume of messages sent.&#x20;

In addition to Meta pricing, our service incurs a platform fee to cover the costs associated with using our platform. This fee ensures that you receive comprehensive support and access to our advanced features and tools. For more details on the platform fee and how it applies to your specific needs, please contact our dedicated support team at *<mark style="color:blue;"><support@d7networks.com></mark>*.

**6.What are Templates in WhatsApp Business API?**&#x20;

Templates in WhatsApp Business API are pre-approved message formats used by businesses to send notifications, alerts, or responses to customers. These templates ensure consistency and compliance with WhatsApp's policies.

**7.Why is Template Registration Necessary?**&#x20;

Template registration is necessary to comply with WhatsApp's guidelines and policies for business messaging. It ensures that businesses provide users with relevant and non-intrusive messages, enhancing the overall user experience.

**8.How Long Does Template Approval Take?**&#x20;

The time taken for template approval varies depending on factors such as message complexity, volume of submissions, and WhatsApp's review process. Typically, approval can range from a few hours to several days.


# Start using Number Lookup

Verify the validity and reachability of phone numbers before sending messages. Ensure your communication is efficient and cost-effective.

The Number Lookup Service is a vital tool designed to verify the validity and reachability of phone numbers before initiating any communication. By ensuring your messages are sent only to active and reachable numbers, this service helps you improve the efficiency of your communication efforts and minimize unnecessary costs. Utilize our Number Lookup Service to streamline your outreach and achieve better results. Please note that this service is available at an additional cost.

### Benefits

* **Increased Accuracy**: Ensure your messages are delivered to the correct recipients.
* **Cost Savings**: Avoid the expense associated with sending messages to invalid or unreachable numbers.
* **Better Campaign Performance**: Enhance the success rate of your outreach by focusing on active numbers.

Experience the power of our Number Lookup Service by navigating to the "Getting Started" section of the Number Lookup tab in your user dashboard. Simply enter the phone number you wish to verify, including the country code, and initiate the lookup process.

<figure><img src="/files/fI75lFVlAEziv1yAPeYG" alt=""><figcaption></figcaption></figure>

### Lookup Result Parameters

* **Phone Number**: The phone number being looked up.
* **Country**: The country code of the phone number.
* **Reachability**: Indicates whether the phone number is reachable or not.
* **Network**: The network provider associated with the phone number.
* **MCC**: Mobile Country Code, identifying the country of the network provider.
* **MNC**: Mobile Network Code, identifying the network provider within the country.
* **Ported**: Indicates whether the phone number has been ported (transferred) from one network provider to another.
* **CIC**: Customer Identification Code, a unique identifier for the phone number.
* **IMSI**: International Mobile Subscriber Identity, a unique identifier for the SIM card.
* **OCN**: Operating Company Number, identifying the company that operates the network.
* **Recipient Type**: Indicates the type of recipient, such as mobile or landline.
* **Status Code**: The numerical code representing the status of the lookup request.
* **Status**: The textual description of the status code, providing additional context about the result.


# FAQs


# Start using Verify&#x20;

Ensure security with the Verify OTP. Explore its features, configuration options, and guidelines for effective user verification.

### Features

**OTP Generation**

* **Automatic Generation**: OTPs are generated automatically and are unique for each verification attempt.
* **Custom Length**: Users can configure the length of the OTP (must be between 2 to 10 digits).

#### OTP Delivery

* **Delivery Methods**: OTPs can be sent to users via SMS or WhatsApp.
  * **SMS Delivery**: The OTP is sent to the user's registered mobile number.
  * **WhatsApp Delivery**: The OTP is sent to the user's registered WhatsApp number.
* **Registered Sender ID for SMS**: To make use of the Verify OTP feature via SMS, the user must have a registered Sender ID.
* **Registered Business Phone Number for WhatsApp**: To make use of the Verify OTP feature via WhatsApp, the user must have a business phone number  and an authentication template registered with Meta.

#### OTP Validation

* **Validation Window**: Configurable time window during which the OTP is valid (e.g., 5 minutes).
* **Retry Attempts**: Limit on the number of allowed retry attempts for entering the OTP.

The Verify OTP feature enhances security by adding an extra layer of verification. By following the configuration and usage guidelines, users can effectively utilize OTP for secure authentication processes. Ensure that a registered Sender ID is in place for SMS delivery to maintain compliance and reliability. For a comprehensive understanding and to see the feature in action, test it from our dashboard and refer to the video demonstration provided.

**OTP Verification via SMS**

{% embed url="<https://d7networks.com/media/documents/Verify.mp4>" %}


# Verify Report

Explore detailed logs and analytics for OTP verification activities with our Verify Report Page. Search, filter, and download reports easily.

The verify report page shares many similarities with the SMS Report Page, allowing users to search, filter, and download reports. This document outlines the functionalities and features specific to the Verify Report Page.

<figure><img src="/files/rM93vluIsuS2Cs9vV2bZ" alt=""><figcaption></figcaption></figure>

### Features

**Search Functionality**

* **Keyword Search**: Users can search for specific records using keywords.
* **Time Frame**: By default, the report displays records from the last one month from the current date.

#### Filtering Options

* **Country Filter**: Users can filter OTP verification records based on the country.
* **Status Filter**: Users can filter records by the status of the OTP (e.g., sent, delivered, scheduled).

#### Detailed Logs

* **View Detailed Log**: There is an option to view detailed logs for each OTP verification attempt, providing comprehensive information about each transaction.

#### Download Report

* **Report Download**: Users have the option to download the OTP verification report for further analysis or record-keeping.

The Verify Report Page functions similarly to the SMS Report Page, providing a consistent user experience across different types of reports.


# Verify settings

Configure OTP verification settings with ease using our Verify Settings Page. Ensure seamless user verification with customizable options.

<figure><img src="/files/eC4HcHPclkzdLLRHjFWt" alt=""><figcaption></figcaption></figure>

### Features

#### Generate Verify Secret

* **Verify Secret**: A unique secret key essential for the OTP generation process. This secret is linked to your OTPs, ensuring secure and accurate verification. Users can generate a new Verify Secret as needed.

#### Callback Settings

* **Callback on Success**: Configure a URL to be called when an OTP verification is successful.
* **Callback on Failure**: Configure a URL to be called when an OTP verification fails.

#### OTP Settings

* **OTP Expiry**: Set the duration (in minutes) for which the OTP remains valid. After this period, the OTP will expire and cannot be used for verification.
* **OTP Code Length**: Configure the length of the OTP code. This typically ranges from 2 to 10 digits.
* **OTP Retry Delay**: Set the minimum delay (in seconds) between OTP retry attempts. This helps prevent abuse and rapid retries.
* **OTP Retry Limit**: Define the maximum number of allowed retry attempts for entering the OTP.
* **OTP Type**: Specify the type of OTP, such as numeric, alpha or alphanumeric.
* **OTP Channel**: Choose the delivery channel for the OTP. Options include SMS and WhatsApp.

#### Verify Message Templates

* **Add Message Templates**: Create and manage templates for the messages sent during the OTP verification process. These templates can be customized to match the desired content and format.

###


# FAQs


# Page


# Sync Zoho CRM with D7 Dashboard

Connect your account with Zoho to import contacts effortlessly and streamline your contact management process. Enhance workflow efficiency and productivity with the Zoho Integration.

#### Configuration Process

* **Connect with Zoho:** Initiate the integration by clicking on the "Install" button on the Zoho card in the Integrations page and follow the on-screen instructions

&#x20;      You can watch this instructional video for a step-by-step walkthrough.

{% embed url="<https://d7networks.com/media/documents/zoho.webm>" %}

* **Authorization**: Authenticate your Zoho account to grant the necessary permissions for contact import.
* **Import Contacts**: Once the integration is installed and authorized, import your contacts from Zoho into your account. For details, read our [detailed guide](/contact-book/add-your-contacts) on the process.


# Sync HubSpot with the D7 Dashboard.

Streamline your workflow by importing contacts seamlessly from HubSpot using our integration. Enhance productivity and efficiency.

#### Configuration Process

* **Connect with Hubspot:** Initiate the integration by clicking on the "Install " button on hubspot card in Integrations page and follow the on-screen instructions.

&#x20;      watch this instructional video for a step-by-step walkthrough.

{% embed url="<https://d7networks.com/media/documents/hubspot.webm>" %}

&#x20;

* **Authorization**: Authenticate your HubSpot account to grant the necessary permissions for contact import.
* **Import Contacts**: Once the integration is installed and authorized, import your contacts from HubSpot into your account. For details, read our [detailed guide](/contact-book/add-your-contacts) on the process.


# Integrate WSO2 IS

Enable Multi-Factor Authentication (MFA) using SMS One-Time Passwords (OTP) in your application by utilizing D7 API from WSO2.

### Integration Steps

* **Add MFA with SMS OTP**

To configure a custom SMS provider, in the SMS Provider section click the Custom tab and fill the required fields.&#x20;

SMS Provider URL: <https://api.d7networks.com/messages/v1/send&#x20>;

Content Type: JSON&#x20;

HTTP Method: POST

&#x20;Headers: Authorization: Bearer YOUR\_API\_TOKEN\_FROM\_D7\_DASHBOARD.( Get your API token from  <https://app.d7networks.com/api-tokens>)

**Payload Template:**

```
{   
    "messages": 
    [     
        {         
            "originator": "WSO2",         
            "recipients": [{{mobile}}],         
            "content": "Your OTP code for login is: \{{body}},         
            "client_ref": "WSO2"          
        }     
    ]        
}
```

Please ensure to replace the originator with your registered sender id.

<figure><img src="/files/alGuHjNegz5vb6I1ecL0" alt=""><figcaption></figcaption></figure>

* **Add MFA with WhatsApp OTP**

For WhatsApp OTP, we currently use the custom SMS provider. To configure it, go to the SMS Provider section, select the Custom tab, and complete the required fields.

SMS Provider URL: <https://api.d7networks.com/whatsapp/v2/send&#x20>;

Content Type: JSON&#x20;

HTTP Method: POST&#x20;

Headers: Authorization: Bearer YOUR\_API\_TOKEN\_FROM\_D7\_DASHBOARD

Payload Template:

```
{
    "messages": [
        {
            "originator": "+91 90615 255xx",
            "content": {
                "message_type": "TEMPLATE",
                "template": {
                    "template_id": "otp_test",
                    "language": "en",
                    "buttons":{
                        "actions": [
                            {
                                "action_index": "0",
                                "action_type": "url",
                                "action_payload": {{body}}
                            }
                        ]
                    }
                }
            },
            "recipients": [
                {
                    "recipient": {{mobile}}
                }
            ],
            "client_ref": "WSO2-WA"
        }
    ]
}
```

Please ensure to replace the originator with your registered WhatsApp number and the template\_id with the ID of the template you’ve registered in the D7 User Dashboard.

<figure><img src="/files/SZ58fTtIlp8JNgH8CMIq" alt=""><figcaption></figcaption></figure>

* **Enable MFA in Your Application**

You can refer to the following link to enable MFA for your application in WSO2-IS: <https://is.docs.wso2.com/en/latest/guides/authentication/mfa/add-smsotp-login/&#x20>;

* **Verify Your Identity**

Once enabled, customers will be able to verify their identity using their mobile number.

<div><figure><img src="/files/8RnruhnEbBZBDKkiLHTX" alt=""><figcaption></figcaption></figure> <figure><img src="/files/SKXAaWwhcsWT3w1MfhlS" alt=""><figcaption></figcaption></figure></div>

* C**onfigure OTP expiry, alphanumeric characters, and OTP length settings.**

1. Navigate to **Connections**.
2. Select **SMS OTP** > **Setup** > **Settings**.
3. Configure the desired settings for OTP expiry, alphanumeric characters, and OTP length.

<div><figure><img src="/files/lkNbthThwVC2wQCuyVd8" alt=""><figcaption></figcaption></figure> <figure><img src="/files/xdc0reVP4XbZ4WKu6uVf" alt=""><figcaption></figcaption></figure></div>


# Active Campaign


# Integrate WhatsApp API

Make your customer communication easier by integrating D7 WhatsApp API from ActiveCampign.

## How to Use the D7-WhatsApp Extension on ActiveCampaign

Follow these steps to integrate and use the D7-WhatsApp extension within ActiveCampaign

1. **Add Action in Automations**

Navigate to the Automations section. Click on Add Actions

<figure><img src="/files/x7cjAxJXHBOl2WviSiZ9" alt=""><figcaption></figcaption></figure>

2. **Select D7-WhatsApp Endpoint**

In the search bar, type "D7". Select the desired WhatsApp endpoint you want to use.

<figure><img src="/files/3jOwmU63ptNsD0aoKApp" alt=""><figcaption></figcaption></figure>

3. **Generate and Add API Token**

You will be redirected to a window asking for an API token.&#x20;

<figure><img src="/files/pcgLA78BCJkBDqGKRhop" alt=""><figcaption></figcaption></figure>

&#x20;To generate a token, navigate to: <https://app.d7networks.com/api-tokens>. Create a new application named "ActiveCampaign".

<figure><img src="/files/EC8vrwY3qQBamQHsLH8C" alt=""><figcaption></figcaption></figure>

&#x20;Click on Generate Token and copy it

<figure><img src="/files/XV412Kr3vN6nzkSjgwaC" alt=""><figcaption></figcaption></figure>

Paste the token into the ActiveCampaign Automation window.

4. **Configure WhatsApp Message Details**

Click Next, and you will be prompted to enter the required details:&#x20;

Originator: Get it from <https://app.d7networks.com/whatsapp-meta/registered-numbers>.

<figure><img src="/files/Dt0ixCAt9ZSWbKCMLS7d" alt=""><figcaption></figcaption></figure>

Language & Template ID: Retrieve from <https://app.d7networks.com/whatsapp-meta/whatsapp-meta-template>.

<figure><img src="/files/5V4xDXCqkvuDBNPMnDii" alt=""><figcaption></figcaption></figure>

Fill in the remaining details.

<div><figure><img src="/files/dubDvpBzZi5adJJUcWft" alt=""><figcaption></figcaption></figure> <figure><img src="/files/mv7Eqm9Q2GCUVWxCEdXq" alt=""><figcaption></figcaption></figure></div>

5. **Activate the Automation**

Once the setup is complete, activate the automation.

<figure><img src="/files/TvILGTLrB7qvS2O8z58S" alt=""><figcaption></figcaption></figure>

6. **Monitor Automation Logs**

After a trigger is initiated, you can find the automation log under each contact’s Recent Activities section.

<figure><img src="/files/EfrXF5JWmDYkEZbBRjGg" alt=""><figcaption></figcaption></figure>


# Integrate SMS API

ActiveCampaign + D7SMS integration allows you to send SMS messages to contacts using the "Send SMS Message using D7SMS" automation action.

### **Requirements:**

1. ActiveCampaign account
2. D7SMS account (You can also use trial account without a purchase)
3. Positive balance on D7SMS account

#### **Notes:**

● This automation action sends outbound messages only. For tracking, replies, reporting, and billing,\
please check D7SMS account at <https://app.d7networks.com>\
● Messages sent with this automation action will be sent to contacts who (1) reach this step in your\
automation and (2) have a mobile phone number stored in the standard ActiveCampaign phone\
number field.\
● Messages sent with this automation action have a 700 character limit. This includes field values for\
any personalization tags you use in the message.\
● The recipient's phone number should have a country code prefix. You can also set the default\
country here, and all your messages will be prefixed with the selected country code.

### How the D7SMS app works on ActiveCampaign:

❖ Generate D7SMS Token\
❖ Create automation on ActiveCampaign\
❖ Connect to your D7SMS account\
❖ Configure Message Content, Source address and Message encoding\
❖ Enable/Activate Automation

**1.Generate D7SMS token:**

D7SMS connection uses OAuth 2.0 based Bearer token authentication and you can create this token at the\
developer section of <https://app.d7networks.com/>\
Following are the steps by step instructions to create the token:\
a. Signup with <https://app.d7networks.com/>\
b. Navigate to <https://app.d7networks.com/developer/applications>\
c. Click on “Create App”\
d. Enter an Application Name and “Save”

<figure><img src="/files/N4XBcnQKWDYNhMsIDHvL" alt=""><figcaption></figcaption></figure>

e. On the next window click on “Generate Token” and copy the token generated.

<figure><img src="/files/IFQHbJU33jkuD4SfYaM1" alt=""><figcaption></figcaption></figure>

**2.Create automation on ActiveCampaign:**

a. Log in to ActiveCampaign account and Navigate to “Automations”\
b. Click on “Create an automation”

<figure><img src="/files/QuqhzrJ3kKIFPP4GeGIZ" alt=""><figcaption></figcaption></figure>

c. Select Triggers as you wish

<figure><img src="/files/XvNEuYoy8E7GjkGlgCzh" alt=""><figcaption></figcaption></figure>

d. Choose “Action option” ‘s

<figure><img src="/files/1Xx85VeDjZJFp9CNGVwU" alt=""><figcaption></figcaption></figure>

**3.Connect your D7SMS account:**\
a. From your automation, click "CX Apps" in the right menu and select “Send SMS Message\
using D7SMS” action and drag it to your automation.

<figure><img src="/files/8eEnElyD4S1ZDkAC5xSH" alt=""><figcaption></figcaption></figure>

<figure><img src="/files/5nv3x5qkEbgomogBrXPR" alt=""><figcaption></figcaption></figure>

b. Enter D7SMS Token which is generated earlier

<figure><img src="/files/eD8GeJ1jhw5fy2u019PA" alt=""><figcaption></figcaption></figure>

c. Select the account

<figure><img src="/files/n3CpPD5ErZgAwel6gEkX" alt=""><figcaption></figcaption></figure>

**4.Configure Message Content, Source address and Message encoding:**

a. Configure “Message Content”

<figure><img src="/files/c3BgaUODqmabjOPbTBup" alt=""><figcaption></figcaption></figure>

b. Configure “Originator” and “Data Coding”

<figure><img src="/files/vqH5WjBSwuEyuJ78xXR9" alt=""><figcaption></figcaption></figure>

**5.Enable/Activate Automation**

<figure><img src="/files/gJjvW7niiztrxWOFdA78" alt=""><figcaption></figcaption></figure>


# Add your contacts

Effortlessly manage your campaigns with our user-friendly contact addition feature. Streamline your process and enhance campaign effectiveness with ease.

We provide three convenient methods to add your contacts, catering to different needs and preferences:

**1. Import List**

* **Upload CSV or XLSX**: Simplify the process of transferring large amounts of data by uploading a CSV or XLSX file. This method allows you to import an extensive list of contacts in one go, saving time and reducing the risk of manual errors. Just prepare your file with the necessary contact details and upload it directly to our system. Ensure your CSV file includes column headers and recipient's phone numbers with country codes for smooth processing.&#x20;

{% embed url="<https://d7networks.com/media/documents/contacts_import.webm>" %}

**2. Add Single Contact**

* **Fill Contact Form**: For those who need to add a few specific contacts, our single contact form is the perfect solution. You can manually enter each contact's details, including name, phone number, email, and any other relevant information, and save them one by one. This method is ideal for updating your contact list with new or unique entries without hassle.

<figure><img src="/files/YhUEqLiqG261VrQziGAb" alt=""><figcaption></figcaption></figure>

**3. Import from Integrations**

* **Install Integrations**: Enhance your contact management by connecting our platform with popular CRM systems such as Zoho and HubSpot. Our integration feature allows you to directly import contacts from these systems into our platform. Simply install the necessary integrations, sync your accounts, and import your contacts seamlessly. This ensures that your contact information is always up-to-date and comprehensive.

The following instructional videos guide you through the process of integrating and importing contacts from HubSpot and Zoho. By following these steps, you can seamlessly sync your accounts and enrich your contact database, streamlining your campaign management process.

**How to Import Contacts from HubSpot:**

{% embed url="<https://d7networks.com/media/documents/HS-Contact-.webm>" %}

**How to Import Contacts from Zoho:**

{% embed url="<https://d7networks.com/media/documents/Zoho_contact_import.webm>" %}